How to Fold a Blanket Into a Cozy Dog Bed
You’ve got the perfect blanket, and turning it into a cozy dog bed is simpler than you think. First, lay it flat and fold it in half twice to create a stable, multi-layered base. Next, tuck all the loose ends neatly inside those layers—this anchors everything so the bed stays put. You’ll have a snug, supportive nest in minutes, and a few extra tweaks can make it even better.
Gather Your Supplies for a No-Sew Dog Bed
All right, you want to make a no-sew dog bed but aren’t sure where to start. First, you’ll gather your core supplies. Your main component is a soft pillow or insert. For a 20″ x 30″ pillow, you need fleece pieces that are 24″ x 34″. That four-inch margin is essential for the no-sew method. You’ll want two coordinating fleece fabrics, about two yards of each. Think about color coordination with your room. More importantly, consider fabric weight; mid-weight fleece drapes well for tying. You also need sharp fabric scissors, a ruler, and chalk for marking. That’s your foundational kit. For long-term neatness, store your fleece using the same compact folding techniques you’d apply to bed linens. This DIY project emphasizes a cost-effective solution similar to selecting budget-friendly furniture for small spaces. You can also use alternative fabrics like medium to heavyweight cottons, though they require sewing due to poor tying and fraying. Your next step is choosing the perfect blanket or fleece to work with. This method is perfect for creating a space-saving pet bed under furniture like a Murphy bed.

Premium Dog Bed: Soft fleece premium plush material makes it gentle feels surface and the high density foam inner makes it durable for long time use(no deformation in 3 years). Good for small or large dogs.
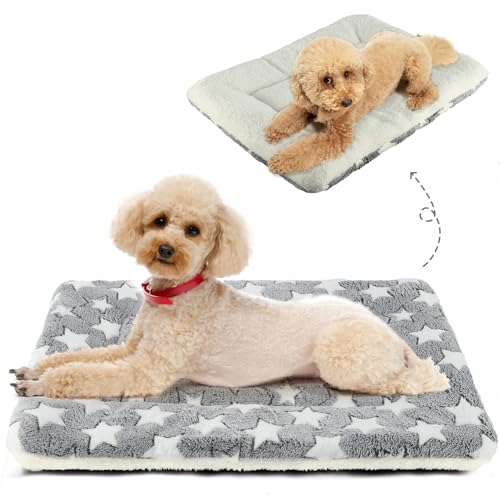
No More Boring Colors - Our cute pet bed mat comes in pink, blue and brown. You also have the reversible side to match different home décor.

Luxurious and Soft: This blanket fiber is different from flannel material, featuring long fiber that twice the length of flannel plush, which provides ultra soft and cozy feeling. The single-layer long hair blanket provides a delicate, velvety texture, adding a touch of opulence and coziness
Pick the Best Blanket for Your Dog’s Bed
Now, you’ve got your supplies but might be wondering which blanket actually works best — here’s what makes a real difference. Start with material types. Prioritize plush fleece or tightly-woven microfiber for daily durability; they resist snagging. Avoid loose knits that nails will destroy.
Your dog’s comfort dictates your pick, so weigh seasonal considerations. Use a thick Sherpa for a senior dog in winter but switch to a light, cooling blanket for summer. A waterproof backing is a smart, year-round feature for easy clean-up.
For larger breeds in particular, ensure the blanket is secured to a non‑slip surface to maintain a safe and comfortable sleeping area. For further stability on smooth floors, a low‑cost rug gripper can provide extra traction under the bed. Consider these same principles for selecting safe and stable bed shelf options for bunk beds in a child’s room.

100% WATERPROOF & LEAKPROOF PET BLANKET: This liquid leak pee proof blanket is plush, soft and warm and works as a cover to keep your bed, couch, sofa moisture free. Perfect for small, medium, large dogs and cats for indoor and outdoor. The fleece microfiber blanket is reinforced with a protective layer that stops any liquids, water, or urine from leaking. The water resistant function of this dog blanket means your pet will stay dry, calming and comfortable throughout the day.

Warm & Cozy Blanket: Dog blanket is lined with ultra-soft warm sherpa on one side and premium flannel fleece on the other. The waterproof pet blanket blocks dampness and cold, keeping your cats and dogs comfortable and warm.
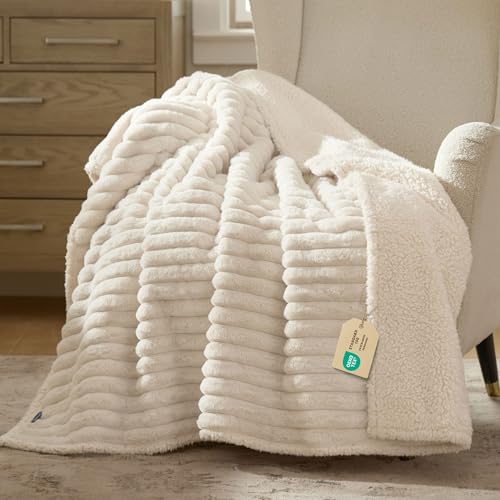
Pure Sherpa Softness:Stay ahead of your snuggle game with one of our most iconic pet essentials. Made with comfort and coziness in mind, our blanket provides the ultimate lounging experience that provides ample warmth. Crafted with fully lined Corduroy & Sherpa(Contains no animal-derived materials), a fabric renowned for its unmatched comfort and long-lasting durability.
The Core Fold: Create a Cozy Nest in Minutes
You’ve picked your blanket, but you might be wondering how to actually transform it into a cozy nest. Now, your fabric selection matters for the fold itself. Heavy blanket materials will create a thicker, more supportive base. First, you lay the blanket flat. Fold it in half. This simple step creates your two-layer foundation without any cutting. It’s the fastest start. For a bigger bed, you obviously use a larger blanket; it gives you more material instantly. This folding method slashes your work time drastically. Your core nest is ready in minutes.
The key is positioning these layers correctly. Place the right sides together if you’re sewing. Smooth alignment prevents bunching and guarantees durable, flat seams. Align fabric edges to ensure accurate construction later, similar to preparing a box corner, or achieving a taut and wrinkle‑free fit for specialized beds. This technique is essential for handling different sheet sizes effectively. Tight rolling can preserve fabric integrity just as it does when storing sheets.
Just remember to leave an opening along one edge for turning and stuffing later.
Build Supportive, Raised Bumpers
You might be wondering how a simple blanket gets those comfy, raised sides that make a dog bed so cozy. It’s all about structure. You build supportive bumpers by folding or sewing.
Start by folding your blanket in half. Now, measure about 7 inches inward from each side and stitch a border line. This creates a channel. For serious fabric reinforcement, sew two blanket pieces together, right sides facing, and leave a gap. Turn it right-side out and stuff the border firmly. This hand-sewn wall is what your dog will snuggle against. Adding weighted corners with a bit of filling or a discreet stitch anchors the bed, preventing sliding. That built-in bumper makes a secure nest, giving your pup a perfect place to rest its head. For a sturdy base, consider constructing a simple wooden frame like a plywood support panel to place underneath the padded bedding, ensuring a stable and level platform that won’t shift, similar to constructing a sturdy mattress platform for a raised bed. To ensure your frame is robust, follow a detailed process of measuring and cutting the frame for a perfect fit. Always begin this process by taking precise measurements to ensure a proper fit, just like the initial step for building furniture such as a well-supported bunk bed.
Adjust the Size for Your Dog’s Breed
Your dog’s size and shape directly affect that bumper’s comfort. Now, let’s match your blanket’s folded dimensions to them.
Here’s the thing: breed compatibility matters. It’s your shortcut. Obviously, a Chihuahua needs a different space than a Labrador. Use those breed-size categories as your guide. For a medium 30-pound Beagle, aim for about 30 by 36 inches. For a large 70-pound Shepherd, target 27 by 46 inches. This smart size selection guarantees your pup can curl or stretch properly. Consider the overall length of your folded bed, much like measuring for a twin-over-twin bunk bed. Ensuring proper guardrail heights for safety is as important for bunk beds as securing the sides of your dog’s makeshift bed is for their security, so always check your weight capacities against your dog to ensure stability.
Your key move? Always measure your dog and compare to your folded blanket’s final size. Choose the larger option if they’re between sizes. That’s your clear path to a custom fit. Ready to make it even cozier?
Add Layers for Extra Warmth and Cushion
Just pin or tuck these materials into your folded blanket’s structure. This creates a cushioned, warm pocket without any sewing. Consider the support principles for space-saving furniture when selecting your insulating layers, ensuring the materials provide adequate weight capacity for your pet. Like choosing a mattress for a bunk bed, prioritize a low-profile design to maintain stability and safety. Your layered bed is now a cozy, insulated retreat ready for napping.

SELF HEATING CAT PAD - This self warming dog mat features a thermal insulation layer inside that reflects your pet’s body heat back to them. The crate pad uses self-heating technology to provide natural warmth without the need for plugs or electricity.

【Fits Door Sizes 36" x 82"】 Magnetic thermal insulated curtain size: 39" x 84", compatibility with the door sizes of 36" x 82". It can be attached using Velcro-like strips and includes extra push pins for added security and strength. It's essential to measure your door before purchasing to ensure proper fit.

Enough for Daily Use: you will get 2 pieces of heavy duty survival blanket in green with 8 iron stakes. Whether you are camping with a partner or preparing a home emergency kit, you need enough coverage for 2 people. When an unexpected storm hits, this survival tarp becomes an ideal shelter for you and a friend
Secure the Folds for Lasting Stability
Now, securing those folds might seem tricky, but here’s the thing: it’s all about creating a stable structure that won’t unravel as your dog settles in. Focus on fabric anchoring first. After folding your blanket in half lengthwise and then again, you’ll tuck any loose ends deep inside the layers. This prevents dangerous tangling and anchors the fabric together. This simple act of tucking is a primary stability step. It creates a solid base for effective pressure distribution. When your dog lies down, their weight gets evenly spread across the multi-layered pad. This stops the bed from shifting or flattening in one spot. Just as with folding a sofa bed, careful attention to the frame’s locking mechanism is crucial for maintaining a secure and compact form. For long-term use, prioritize the durability and ease of setup you would look for in any folding furniture. A stable, anchored fold means a safer, more comfortable nap for your pup every single time.
Advanced Option: When to Sew for a Permanent Bed
Although you’ve mastered temporary folds, you might be wondering when it’s worth sewing a permanent bed. Consider your sewing prerequisites first. You’ll need a machine for heavy-duty materials like ballistic nylon and time for complex projects.
Now, the durability comparisons are stark. A quality sewn bed with flat-felled seams can last 5-7 years. Folded blankets typically need replacing every 6-12 months due to wear and fraying.
Sew permanently if your dog is a heavy chewer or you want waterproof protection. It’s also ideal for long-term cost savings. Your project might take a weekend, but the payoff is a robust, washable sanctuary. Next, you’ll need to select your specific materials and plan your design.