How to Build a Murphy Bed: Step‑by‑Step Guide
You’re looking at a big project and wondering where to start. Obviously, building a Murphy bed is detailed. First, meticulously validate your plans against your room’s exact width, depth, and height. You’ll then cut and label all plywood and pine components—a track saw helps here—before assembling the frame with its pivoting hardware and struts. Next, you build the cabinet, mount it securely to wall studs, and run full test cycles. Getting these foundational steps right means everything else clicks into place.
Review Your Murphy Bed Plans and Cut List
First, you’re right to wonder if the plans and cut list are really that essential—obviously they are, but where exactly do you start? Your first job is plan validation. Pull your room’s exact measurements: width, depth, and height. Now, cross-check these against the plan’s dimensions for your chosen mattress size, like a queen vertical for higher ceilings. This confirms everything fits before you cut a thing. Next, run a thorough component checklist against the cut list. You’re verifying every board, strut, and bracket is accounted for. A kit’s list tracks all parts, from 1×2 pine for the mattress frame to specific screw sizes. This prevents mid-build shortages. Your clear takeaway? Validate your space, then inventory every piece. Now you’re ready to prepare your materials. Ensure your layout planning includes precise measurements for the pivoting mechanism and lifting hardware to achieve a smooth folding motion, and always consult a structural reference or professional to assess wall reinforcement needs for the mounting brackets. As part of your final finish, consider integrating concealed wiring for added lighting or nearby outlets.

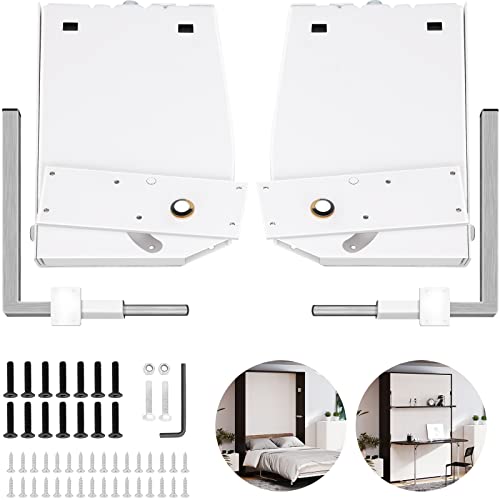
𝐂𝐎𝐌𝐏𝐋𝐄𝐓𝐄 𝐌𝐔𝐑𝐏𝐇𝐘 𝐁𝐄𝐃 𝐇𝐀𝐑𝐃𝐖𝐀𝐑𝐄 𝐒𝐘𝐒𝐓𝐄𝐌 — WHAT’S IN THE KIT — Includes gas piston lift system (smooth open/close rated for daily use), patented 2-in-1 auto-locking stainless steel pivot plates, heavy-duty square tube folding legs, quick-release mattress retention strap, all mounting hardware and fasteners, plus 3 fully illustrated guidebooks (Cut List Guide, Construction Guide, Assembly Handbook). No separate hardware store runs needed for the mechanical components.

TIME TESTED: Our kits have stood the test of time for over 35 years. If you’re going to build a high-quality murphy bed, you want it to last a lifetime. American-made steel, labor, and support are behind each kit.

🛏️【Complete Queen-Vertical Murphy Bed Kit】Finished size reference: 87-1/8-inch H x 65-7/8- inch W x 15-7/8- inch D (closed) x 87 inches deep (open).A complete Murphy bed queen hardware kit can easily mount your cabinet folding bed on the wall and save space for your guest room & living room.
Cut and Prepare All Murphy Bed Components
You might be wondering how to take those plans and actually turn them into cut pieces that fit together—it’s all about precision and preparation. Your cutting strategies are critical. You’ll need a track saw for clean plywood cuts or a circular saw with a guide. Use a miter saw for pine frame pieces. Follow your cutlist to maximize each sheet and label every piece immediately. Measure all parts at the store before you leave to ensure they match your specifications. Always double-check that your materials meet the load capacities required for the finished bed.
Your material preparation involves more than just sizing. You must apply edgebanding to all exposed plywood edges using a hot iron; this prevents splintering. Also, pre-drill hardware holes with a Forstner bit for accuracy. This meticulous prep is essential for avoiding common installation issues later on. Finally, verify all panel dimensions twice before any cutting—stores won’t accept returns on custom cuts. To ensure long-term safety, consult your local building codes for any specific structural requirements relevant to wall-mounted beds. Now you’re ready to assemble.

Premium Home Improvement Tools: Universal compatibility fits most circular saws in the market with blades up to 7-1/4”

Premium Home Improvement Cutting Tools: Track saw guide turns circular saws into precision, track-guided tools

Maximum Performance - Features TiCo Hi - Density carbide for maximum productivity, longer cutting life, and outstanding performance in ripping, cross-cutting, and plunge cutting applications. Expect superior results with every cut.
Assemble the Bed Frame and Struts
Proper strut maintenance guarantees smooth operation for years. If the bed doesn’t lift easily later, gas troubleshooting starts by checking these connections. The safe raising and lowering of a heavy mattress relies on these specialized mechanical hinge systems, which have been refined since the bed’s historical origins. This style of space-saving furniture truly took hold during the post-war housing boom, often in apartments and small homes. For a stable base, be sure to install support slats across the frame before adding the mattress. Now, lift the frame into the cabinet opening and secure it with the large bolts. Test the movement slowly; it should pivot smoothly without binding. Your frame is now ready for the cabinet.

【SUPERIOR REBOUND FORCE】- One person can freely fold out or up the bed. Inside 5 premium springs, high rebound strength to ensure the whole process.
【SUPERIOR REBOUND FORCE】- One person can freely fold out or up the bed. Inside 9 premium springs, high rebound strength to ensure the whole process.

DIY - The Murphy Door Hidden Door Hinges are for experienced carpenters who would like to DIY their door project! These pins allow a single door to hold up to 300 pounds and function with ease.
Build and Mount the Murphy Bed Cabinet
Now that you’ve got the frame assembled and swinging smoothly, you’re probably wondering how to actually house the thing—that’s where the cabinet comes in.
You’ll assemble the cabinet body first. Stand the sides on edge, then fit the top panel between them. Use your drill to pre-drill and drive six 1.5-inch screws through the top into the sides, angling them slightly for extra strength. Attach the cabinet braces and headboard shelf into their notches with more angled screws. Your mattress selection matters here—verify its thickness to confirm the cabinet’s internal depth accommodates it. Before securing the cabinet, be sure to fasten the bed completely against the wall.
Then, move to wall preparation. Find your wall studs with a stud finder, marking at least three for mounting. Obviously, you need a clear, level space for the bed to fold down. Now, position your finished cabinet against the wall. You’ll secure it using L-brackets and long screws drilled directly into those marked studs. This sturdy mounting prevents tipping, so take your time aligning it perfectly before tightening everything down. When selecting the folding mechanism for your project, it’s crucial to decide between a vertical or horizontal folding design based on your room’s layout. For long-term safety, establish a routine of periodically inspecting the anchors to ensure everything stays solid. The total installation cost can vary significantly based on your choice of materials and whether you hire a professional installer.

[100 LBS HEAVY DUTY GAS STRUTS] Delivers 100 lbs / 445 N of consistent lifting force for 80–110 lbs flip-up lids. It is ideal for RV bed , Rv Storage Compartments, Heavy Wooden Lids,Truck Toolboxes, etc. Single-person effortless handling helps relieve back strain, and the controlled slow-closing function reduces the risk of pinching. Please weigh your lid before purchase

[Gas Struts Info] Extended length: 19.69 inch, Compressed length: 11.82 inch,Force: 150lbs Per Strut, this pair of 20" 150lbs gas strut with Mounting Brackets can support the lid weighing 120-165 pounds

NOTE: Please Check Dimensions Before Order.
Install the Hardware and Apply Finish
Finally, attach the hinged legs for stability when the bed’s down, a design principle that echoes the innovation of John H. B. Miller. Give the whole system several full test cycles. Then apply any wood finish to exposed areas and add handles. For a smooth disassembly later, remember to label all hardware during installation. Your main takeaway? A meticulous hardware install now guarantees smooth, reliable operation for years. The hydraulic struts are very strong and support the mattress weight. Ensure all safety features like guardrails and proper anchoring are correctly implemented for a secure build. Once it passes your safety inspection, you’re ready for the mattress.