
How to Install a Murphy Bed: A Step‑by‑Step Guide
You’re tackling a big project, and it’s smart to research first. The key is securing that cabinet to solid wall studs and perfectly leveling it — your bed’s entire safety depends on this. Then you’ll assemble the frame, attach the hydraulic struts, and run several test cycles with the mattress on. Your next focus is choosing the right wall, as the stud type changes the hardware you’ll need.
Prepare Your Tools and Workspace
Obviously, you’re not just wondering what tools you’ll need; you’re figuring out if you even have the right space and structure to make this work. First, you’ll measure your room against the bed’s folded depth and required ceiling height. You must confirm a clear deployment path, free from doors or furniture, to avoid pinch point hazards during operation.
Your wall needs solid wood or metal studs, typically 16 inches apart, not just drywall. You’ll use a stud finder and mark their centers with a pencil. For tools, gather a power drill with Phillips and Robertson #2 bits, various wrenches, a level, and a step ladder. You will also need specific wrenches and pliers for tasks like attaching corner brackets and mechanism springs. Remember to periodically inspect the anchors after installation to ensure ongoing stability and safety. For floor-standing models, you will instead require a robust base and reinforced flooring to safely bear the weight.
Now, establish your safety protocols. That means protective eyewear, gloves, and planning for dust mitigation with floor coverings. This prep guarantees your space and toolkit are ready, preventing major issues before you build the cabinet.

ACCURATE: More sensors = More accuracy. Conventional stud finders have 1 or 2 sensors. The Sapphire 9000 has 9, making it the most accurate stud locator on the market.

Magnetic Stud Finder Wall Scanner: Battery-free magnetic stud finder helps locate ferrous nails and screws commonly attached to wall studs, giving DIYers a simple wall scanner for hanging shelves, pictures, mirrors, TVs and décor

ACCURATE, EASY TO USE, AND SAFE: PenX Wall and Ceiling Stud and Joist Magnetic Finder innovative US patent pending design enables precise locating of studs and joists behind already existing walls and ceilings. It does not contain any batteries, wiring, or lubricants ensuring long lasting maintenance free use.
Assemble the Main Murphy Bed Cabinet
Assembling the cabinet might feel like the real starting line, and you’re right—it’s the foundational piece everything else hangs on, literally.
First, lay out all parts and hardware. Identify the cabinet sides, top, braces, and trim. Assembly safety starts here—check those cabinet materials for the baseboard notch in the trim. Now, attach the trim to the cabinet sides with 1-inch screws. You’ll use 16 screws per side.
Stand the sides upright to attach the cabinet top. Pre-drill and use six 1 ½-inch screws, angling them for strength. A partner helps here. Because the box is very heavy, a two-person lift is often necessary to safely position it. Next, install the two braces and the headboard shelf, pre-drilling all holes. Your cabinet is now a solid box. This guarantees the bed mechanism mounts correctly later. A correctly assembled cabinet is crucial for the overall structural integrity of the finished unit. Begin the layout planning at this stage by double-checking all measurements against your initial design sketches. This wall-mounted frame is the core of the space-saving design, enabling the bed to fold down smoothly using concealed hinges and counterbalances.

𝐂𝐎𝐌𝐏𝐋𝐄𝐓𝐄 𝐌𝐔𝐑𝐏𝐇𝐘 𝐁𝐄𝐃 𝐇𝐀𝐑𝐃𝐖𝐀𝐑𝐄 𝐒𝐘𝐒𝐓𝐄𝐌 — WHAT’S IN THE KIT — Includes gas piston lift system (smooth open/close rated for daily use), patented 2-in-1 auto-locking stainless steel pivot plates, heavy-duty square tube folding legs, quick-release mattress retention strap, all mounting hardware and fasteners, plus 3 fully illustrated guidebooks (Cut List Guide, Construction Guide, Assembly Handbook). No separate hardware store runs needed for the mechanical components.
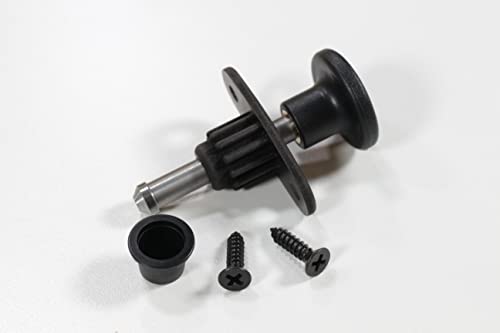
Cabinet lock kit includes all the parts and is designed to secure the Murphy bed frame in the closed position to help prevent unintentional opening

TIME TESTED: Our kits have stood the test of time for over 35 years. If you’re going to build a high-quality murphy bed, you want it to last a lifetime. American-made steel, labor, and support are behind each kit.
Position and Level the Cabinet
Getting the cabinet positioned just right is a bit like setting up a bookshelf that’s about to start doing gymnastics—it needs a solid, level foundation. With a helper, walk it upright to its final spot against the wall. Check for proper clearance on all sides, especially for the bed’s swing and mattress deployment, and clear the area of any obstacles for safe assembly. Planning for this clearance is vital as it directly impacts the functionality of the bed mechanism.
Now, level it. You’ll use floor shims to compensate for uneven surfaces. Install the provided easy-level mechanisms by the front kickplate. Drive in 1 1/4-inch wood screws, but don’t over-tighten. Hand-tighten the adjustment bolts last. Most floors are not perfectly even, so this step is essential even if your floor looks flat. Use your level to confirm the cabinet is perfectly plumb. Before final mounting, also ensure the chosen wall location includes sufficient backing in the wall structure and studs to bear the bed’s weight. This stability is critical before you secure it permanently to the wall studs, which is your very next task.
Secure the Cabinet Base to the Floor
You’re probably wondering why you’d need to secure a cabinet to the floor when it’s already against a wall. The answer is stability, especially for countertop mounting and the future bed’s operation. Now, your floor type dictates your method. For concrete, you’d use Tapcon screws into a pre-built 2×4 frame. If you have laminate flooring, remember it often floats; you’ll avoid screwing directly into it. Instead, you build an internal frame secured to the subfloor, then place and shim the cabinet atop it. To ensure everything is perfectly flat, you must shim cabinets up from any low spots to meet the established high point on the floor. Before moving forward, you should perform a thorough safety inspection to ensure this foundational structure is secure. Here’s the thing: you always screw through the cabinet base into that solid floor blocking, not just the finish floor. This creates a rigid foundation, preventing any wobble. This rigid connection is crucial for supporting the weight and dynamic forces from the folding mechanism. This initial foundational step is part of the broader process of assembling the frame for your Murphy bed. Next, you’ll anchor it to the wall.

Thread Size: 0.21" (5.3mm), Flange Diameter: 0.36" (9.2mm), Head Height: 0.15" (3.9mm), Length: 1.25" (31.8mm).

Star Recess Design: Eliminates bit slips and increases productivity by preventing cam-out for consistent, reliable fastening every time

[WHAT YOU GET]: A Pack Of 30 Pcs Of 3/16" X 1-1/4 Slotted Hex Concrete Screws
Anchor the Cabinet to Wall Studs
Here’s the thing: you must only anchor into solid wood studs. Drywall alone won’t hold the weight. If you have plaster walls, be cautious as they can crack; special backing might be needed. For metal studs, you’ll require different hardware altogether. Before proceeding, consult your hardware’s documentation to verify its load capacities, as these directly determine the safe weight limits of your installation.
That secure attachment is your final safety check. When selecting hardware, consider that the original hinges, pistons, and brackets were designed to handle the bed’s weight while folding smoothly. Now you’re ready to move on to the bed mechanism itself.

For concrete/stud and drywall installation

Strong and Reliable: Patented heavy duty drywall anchors hold up to 293lbs on boards of standard thickness (1/2” - 5/8”). This dry wall anchors and screws kit contains 10 fixings with collars and 10 x 13/16” screws

This Light stand adapter is great for wall and ceiling mount.
Install the Murphy Bed Frame and Hardware
Installing the Murphy bed frame and hardware is the core of this project, where all your cabinet work pays off. You’ll first assemble the frame with its flexible slats on the floor, securing it with square brackets. Then, you position it against the pre-mounted plates on your cabinet. Drill pilot holes and use 2.5-inch wood screws to attach the frame here—this is your foundational connection. Secure every slot with a screw from the provided packet to maintain the bed’s warranty. For ongoing reliability, you should integrate a regular maintenance routine that includes checking all hardware.
Now, mechanism calibration is critical. Tighten every bolt completely with a wrench, as this system must handle the full occupant weight without shifting. Test the frame’s movement by raising and lowering it manually before adding any struts. It should travel smoothly in a straight line without binding. This precise setup guarantees safe, reliable operation for years, making it an excellent space-saving solution for small apartments. The reliable movement depends on a well-adjusted piston or spring system as detailed in Murphy bed designs.

【SUPERIOR REBOUND FORCE】- One person can freely fold out or up the bed. Inside 5 premium springs, high rebound strength to ensure the whole process.

𝐂𝐎𝐌𝐏𝐋𝐄𝐓𝐄 𝐇𝐎𝐑𝐈𝐙𝐎𝐍𝐓𝐀𝐋 𝐌𝐔𝐑𝐏𝐇𝐘 𝐁𝐄𝐃 𝐇𝐀𝐑𝐃𝐖𝐀𝐑𝐄 𝐊𝐈𝐓 — EVERYTHING TO BUILD YOUR FULL SIZE WALL BED — Includes gas piston lift mechanism calibrated for side-fold operation (smooth open/close rated for daily use), patented 2-in-1 auto-locking stainless steel pivot plates, heavy-duty folding crossbar leg system, quick-release mattress retention strap, all mounting hardware and fasteners, plus 3 illustrated guidebooks (Horizontal Cut List Guide, Construction Guide, Assembly Handbook). No separate hardware store runs needed for the murphy bed mechanism components.

🛏️【Complete Queen-Vertical Murphy Bed Kit】Finished size reference: 87-1/8-inch H x 65-7/8- inch W x 15-7/8- inch D (closed) x 87 inches deep (open).A complete Murphy bed queen hardware kit can easily mount your cabinet folding bed on the wall and save space for your guest room & living room.
Attach the Hydraulic Struts and Final Parts
Now, with your bed frame moving smoothly in its tracks, you’re ready to add the muscle: the hydraulic struts that make lifting it feel effortless. Start with key safety precautions and careful tool handling—your helper is essential here. This mechanism is a hallmark of modern vertical wall beds, which fold compactly into a cabinet to maximize usable floor space. Many contemporary units also integrate cleverly with custom cabinetry options for a seamless, built-in look.
Attach the lower ends first. Push the rod end onto the ball stud until it snaps. Secure the C-clip. Tape the piston body to the side rail. Do the same on the opposite side. The main drive for the wall bed comes from these gas springs at both ends.
Here’s the final step. With a helper, raise the bed frame fully into the cabinet. Move it in and out an inch or two until the upper fitting aligns with its ball stud. Push it on until it snaps—never force it or use a hammer. Double-check both clips are secure.
You’ve added the power. Next, you’ll verify everything moves as it should.
Test Your Murphy Bed’s Full Operation
Since you’re wondering how you can be sure everything works correctly before finishing the project, testing the full operation is your key to confidence.
Now, you’ll conduct a thorough gas struts testing cycle. Lower and lift the bed frame several times with the mattress installed. Check that the motion feels balanced and smooth. Remember, the pistons can only be attached when extended, which is essential for their proper initial setup.
Here’s the thing: you’re also performing a noise detection analysis. Listen closely for any scraping or grinding during the full open-close cycles.
Finally, verify every safety and alignment point. Confirm the lock engages solidly and the cabinet stays perfectly vertical.
Your clear takeaway is a bed that operates seamlessly under real load before you finalize the installation.
Troubleshoot Common Murphy Bed Installation Issues
Even the most careful Murphy bed installation can hit a few snags, but you’ve already asked the smartest question: how to fix the common issues.
First, check for cabinet tilt. This often stems from a wall-mounted cabinet not being perfectly level. Use your level across the top and sides. Shim between the cabinet and the wall to correct it before final tightening. Ignoring this creates latent stress on the frame.
Latent stress from a tilted cabinet will strain the mechanism. You’ll hear noises or see the bed face rub during operation. Loosen the mounting bolts, re-shim to achieve a perfect level, and then re-tighten everything securely. This relieves the hidden pressure.
Your key fix is revisiting the leveling step. Proper alignment now prevents major wear and safety issues later.