
How to Build a Sturdy Bunk Bed Ladder
You’re right to focus on sturdiness—it’s the whole point. You’ll start by measuring from your top bunk’s platform to find your exact ladder height. Cut your 2×4 rails with a 15-degree angle for a safe climb, then notch them to house steps made from 4-inch poplar boards secured with dowels and glue. Finally, you’ll anchor it firmly to the bed frame with brackets and bolts. Get those angles right, and your climb will be solid for years.
Find the Right Ladder Height and Angle
Because you’re figuring out where to start, the ladder’s height and angle are your real foundation. First, measure from the floor to the top bunk’s platform edge, which might be around 60.5 inches, keeping in mind the overall bunk bed structure varies by mattress configuration. You’ll also account for mattress thickness and the required 5-inch guardrail above it. This precision prevents a ladder that’s too short or dangerously tall. Now, here’s the thing: the Angle Selection Importance is huge. You’ll often use a 15-degree lean for easy climbing, but your manufacturer may specify a tighter 11-degree limit for warranty. Properly marking this angle against the bed prevents wobbling. Honestly, your Building Code Understanding starts right here with these measurements. Always verify that your measurements and final design align with safety standards for bunk beds. A good reference is the mandatory minimum clearance of 33 inches between the top bunk mattress and the ceiling to prevent head injury. Nail this, and you’ve built your plan on solid ground. So, next you’ll consider how to space the steps.
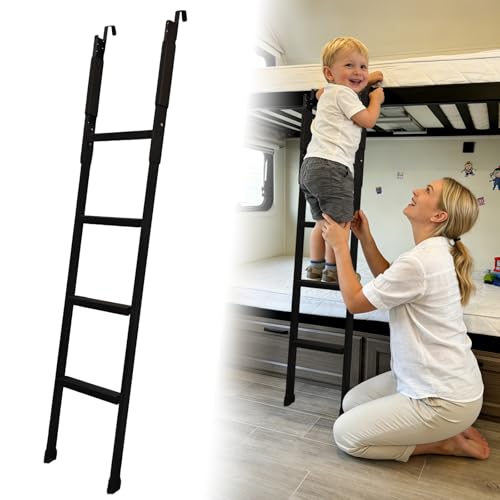
WIDE RANGE HEIGHT ADJUSTMENT: Our bunk bed ladder can be adjusted from 52 to 64 inches without cutting its legs. It features a unique design with 13 adjustment holes spaced 1 inch apart, offering a full 12 inches of flexible height customization. This allows for precise fitting to various bed heights and user needs with just one bunk ladder, far beyond just minor tweaks.

Package Inclusion: you will receive 4 angled bunk bed ladder hooks and 12 matching nails for stable and secure installation; The angled design allows your bunk bed ladder to be mounted at an angle, ensuring ladder's stability and your safety
Gather Your Ladder Tools and Materials
Now, with your ladder’s height and angle figured out, you’re probably wondering what you actually need to buy and have on hand. Your material acquisition centers on two 2x4s for a 6-foot ladder, plus poplar boards for rails and steps ripped to a 4-inch width. You’ll also need 1 1/4-inch dowels. For tools, you’ll use a miter saw, drill with a Forstner bit, and a table saw. Remember power tool safety—always use proper guards and follow operational guidelines. Using a router with a jig is the preferred method for cutting precise notches for the steps. Gather wood glue, finish nails, and an orbital sander. Ensuring your ladder has proper anchoring to the bed frame is a critical safety step often detailed in full construction guides, and it’s just as important as the final safety inspection you’ll perform on the completed bunk. Having everything ready before you start cutting prevents frustration. Your next step is to precisely cut and shape your ladder rails, turning these materials into the ladder’s framework. This foundational work is part of the larger process for a sturdy, functional loft bed.

【Safeguard Your Child】Bunk Bed Ladder Cover prevents unsupervised climbing, reducing fall and injury risks.Providing peace of mind by protecting your child from potentially life-threatening accidents

Bunk Bed Ladder Pads: Climb up your ladder without pain on your feet with our soft ladder pads, These pads will give your foot a soft padding and your kid will walk on a cushion

SUPERIOR CLIMBING COMFORT - Our premium bunk bed step pads are engineered to relieve toe pressure caused by narrow ladder for bunk bed steps. Say goodbye to painful discomfort when climbing barefoot, and enjoy a far more comfortable, stable experience every time you use your loft bed ladder or ladder for bunk bed.
Cut and Shape Your Ladder Rails
Next, rip about 1/4 inch off each side on a table saw. This squares the boards for a crisp look and sets your final width. Aim for a width between 18-21 inches for good fit and foot comfort, which is a key consideration for overall child‑friendly aesthetics. A width in this range also helps ensure proper weight capacity for safe use.
Now, cut a 15-degree angle on both ends. The bottom sits flat, the top meets the bunk. Round these angled ends with a jigsaw for safety, then sand heavily. This shaping prevents splinters and guarantees a solid fit against the bed frame. After rounding, use a router with a round-over bit to round all exposed wood edges for a comfortable grip and safe finish. Always perform a final safety inspection after completing your project.
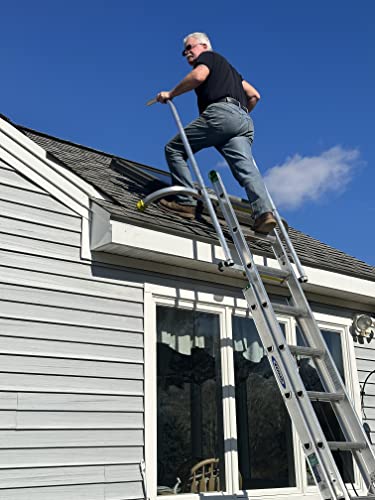
WALK THROUGH DESIGN - Ladder Safety Rails stabilizes your ladder on uneven surfaces. Once installed, the extendable hand rails offer stability and walk-through to step on and off the ladder safely.
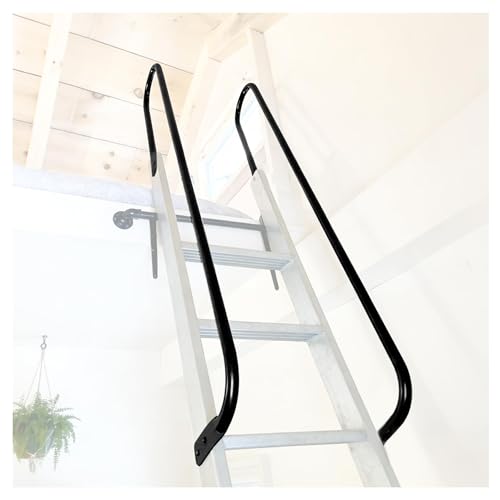
Multi-Scenario Adaptability: Ladder handrails are adaptable to diverse usage scenarios. They are suitable not only for children climbing outdoor play structures, swing sets and climbing frames, but also provide enhanced safety for elderly individuals using handrails to assist with climbing ladders, loft access, and similar structures

🏡 𝘼𝙙𝙖𝙥𝙩𝙖𝙗𝙡𝙚 𝘿𝙚𝙨𝙞𝙜𝙣 𝙛𝙤𝙧 3 𝙤𝙧 4 𝙎𝙩𝙚𝙥𝙨: Offering adaptability, our outdoor handrails accommodate 3 or 4 steps with a max height of 21", post spacing of 29.2", grip surface length of 39" + 10.2", and 2" width. The upper post reaches 38.7". With adjustable height, these handrails ensure stability, particularly in rainy or icy conditions, preventing slips and falls effectively.
Prepare the Steps for Safe Assembly
Properly preparing each step now prevents injuries later. This meticulous prep secures a safe, solid foundation and helps ensure compliance with building codes. Next, you’ll precisely mark where each step attaches. Begin by cutting and organizing all wooden pieces to size, then perform a light sanding on all pieces to remove chips and splinters. Always verify that your materials and construction can support the intended user weight, similar to checking a bunk bed’s safety standards. This process mirrors the initial safety steps of dismantling a bunk bed, which begin with clearing the area and gathering the necessary tools.

【SOLID WOOD MATERIAL】: Heavy duty wood bunk bed ladder made of (3/4 inch) 2 cm thick solid wood, with a non-slip surface pattern of extra-wide treads, with a non-slip, wear-resistant, waterproof, load-bearing, maximum load-bearing capacity of 660 lbs/300 kg ≈ 3 adults or 6 children standing at the same time

【SOLID WOOD MATERIAL】: Heavy duty wood bunk bed ladder made of (3/4 inch) 2 cm thick solid wood, with a non-slip surface pattern of extra-wide treads, with a non-slip, wear-resistant, waterproof, load-bearing, maximum load-bearing capacity of 660 lbs/300 kg ≈ 3 adults or 6 children standing at the same time

【SOLID WOOD MATERIAL】: Heavy duty wood bunk bed ladder made of (3/4 inch) 2 cm thick solid wood, with a non-slip surface pattern of extra-wide treads, with a non-slip, wear-resistant, waterproof, load-bearing, maximum load-bearing capacity of 660 lbs/300 kg ≈ 3 adults or 6 children standing at the same time
Secure the Ladder Steps and Rails
All right, you’ve got your steps ready and the spots marked, so you’re wondering how to actually attach everything so it feels rock-solid. Start with your hardware selection. You’ll want sturdy bolts, mounting brackets, and locking nuts. Obviously, you’re bolting directly into the bed frame’s side rail for permanent security. For your fastening techniques, drill a pilot hole smaller than your bolt to prevent splits. Tighten each bolt with a washer and a locking nut until the bracket is immovable. It’s also wise to use a level to check the ladder’s alignment. Periodically inspect the anchors to ensure the ladder remains stable over time, and check all connections as part of your regular safety tips routine.
Test each step for wobble as you go. Finally, secure any integrated handrails to the bed or ladder side rails with the same robust hardware. Your takeaway is simple: over-engineer the connections. This prevents wobbling and gives you real peace of mind once it’s time to climb.

【SIZE】2.75 x 1.3 x 0.78. Inside Width: 2.5cm/1inch. Package: 4pcs bunk bed hook and equipped with M3.5*14mm and M4*16mm two sets of screws(total 24pcs screws). There is no expansion screw set, and the buyer needs to buy it himself. Please check the dimensions before buying.

Size: 0.87x1.53x3.35inch(LxWxH). Inner width: 2.9cm/1.14inch. Package included 4pcs bunk bed hook.

Complete Bunk Bed Ladder Hook Kit: Includes 4 durable angled J-hook brackets to ensure your bunk bed ladder is securely and stably installed.
Sand and Finish Your Ladder
You’ve got a solid ladder structure, but it’s still raw wood—obviously, you’re wondering how to smooth it out safely and finish it right. Start with an 80-grit orbital sander for fast smoothing, then progress to 120 and finally 220-grit paper. Hand-sand tight grooves up to সাময়িকী grit and round all sharp edges to prevent stubbing. This careful prep is essential for both a fixed and a tension ladder, ensuring clean contact points. Baltic birch’s density and stability make it ideal for ladder construction. Now, apply your stain—like Minwax Rustic Oak—with a cloth, then seal it with multiple varnish coats. Regular maintenance like this helps you spot worn hardware and other wear before it becomes a safety issue. Consistent checks are a key part of routine maintenance for any children’s bed. This finishing protects the wood and makes future step maintenance easier. The proper ladder height and angle are crucial for safe access to a high-rise loft bed with a sleeping platform six feet high. Your ladder’s now safe, smooth, and ready for final mounting.
Securely Mount and Adjust the Ladder Angle
Alright, you’ve got a smooth, finished ladder, so obviously the big question is: how do you get this thing safely onto the bed? Here’s the thing. You need to secure it to the bed frame with recommended bolts. Follow strict safety protocols. Now, mark your attachment points precisely. You’ll mount it onto footboard struts or use custom metal brackets. Aim for a proper, intuitive climbing angle; too steep causes balance loss. Align everything to eliminate dangerous gaps. Before letting anyone climb, you must perform a simple load testing. Push and pull on it yourself. Confirm it supports weight without any wobble. This process should then be repeated for the second bunk bed to ensure both are equally secure. When aligning your ladder, it helps to use a basic shape construction approach, sketching the angle lightly before mounting to visualize the final placement. Your final takeaway: a ladder is only safe when it’s firmly anchored and correctly angled, and it should be part of a routine regular maintenance check to prevent accidents.